My favorite use case for Docker is to spin up a local database for development purposes. Taking this a step further, it is possible to run all neccessary components of your application with a single Docker Compose configuration. Until recently, this has been a painful method of doing development since any code changes would require a full restart to take effect.
Instroduced in version 2.22, docker compose watch allows Docker Compose services to monitor certain code paths and update as you edit and save code.
In this article I will show you how to set up a project using Next.js and PostgreSQL that can be spun up locally using this command.
Creating the Next.js App
To create our Next.js app simply run:
npx create-next-app@latestFrom there, follow the instructions in the terminal to select which components to include. I recommend the default options, TypeScript, ESLint, app directory, etc.
After everything finishes downloading we should be able to run our application in development mode using npm run dev. But we want to run this app using Docker so lets create a Dockerfile:
touch DockerfileInspired by Next.js’s dev Dockerfile example, let’s write instructions to copy the source code over to the container’s /app directory, install the necessary dependencies and run the application in development mode:
FROM node:alpine

RUN mkdir -p /app
WORKDIR /app
COPY package*.json /app
RUN npm install
COPY . /app
EXPOSE 3000

CMD ["npm", "run", "dev"]
At this point we have a runnable docker container for our app. Let’s get started with our docker-compose.yaml and add a profile for this app.
touch docker-compose.yamlversion: "3"
services:
next-app:
container_name: next-app
build:
dockerfile: Dockerfile
volumes:
- ./src:/app/src
- ./public:/app/public
restart: always
ports:
- 3000:3000Now our app can be run by running docker compose up.
Creating the Postgres Database
Let’s create a local database using the official Postgres Docker image. We can do this by appending the following to our docker-compose.yaml:
  postgres-db:
    image: postgres:16.0
    container_name: postgres-db
    restart: always
    environment:
      POSTGRES_DB: example
      POSTGRES_USER: root
      POSTGRES_PASSWORD: 123
    ports:
      - 5432:5432
Now docker compose up additionally spins up a local database that we can connect to by adding the following connection string to a .env file in the root of our Next.js project:
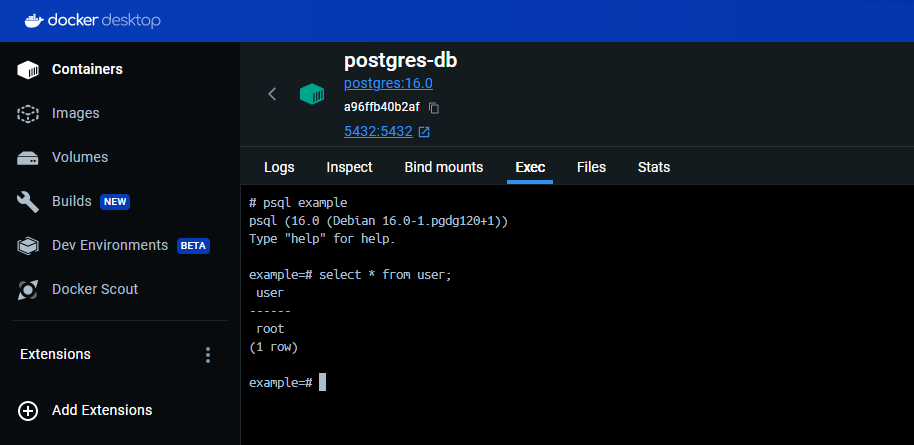
POSTGRES_URL="postgres://root:123@localhost:5432/example"We currently have no way of testing our database through our Next.js app but we can verify that the database is running by executing psql example through Docker Desktop:

Populating the Database
To interact with our database from our Next.js app we need an ORM tool. Let’s install my favorite database ORM drizzle-orm:
npm install drizzle-orm postgres pg
npm install -D drizzle-kit
Now let’s set up our first table using drizzle-orm by loosely following the official quick start example:
- Create our first schema:
touch src/schema/post.tsimport { serial, text, timestamp, pgTable } from "drizzle-orm/pg-core";
export const post = pgTable("post", {
id: serial("id"),
text: text("text"),
createdAt: timestamp("created_at").default(new Date()),
});- Create our drizzle configuration:
touch drizzle.config.tsimport type { Config } from "drizzle-kit";
export default {
schema: "./src/schemas/*.ts",
out: "./src/migrations",
driver: "pg",
dbCredentials: {
connectionString: process.env.POSTGRES_URL!,
},
} satisfies Config;- Create our first migration:
npx drizzle-kit generate:pgThis will create a migration file under src/migrations.
- Apply our migration:
First let’s install some necessary dev dependencies:
npm install -D dotenv tsxThen we can create a migration script:
touch src/scripts/migrate.tsimport postgres from "postgres";
import { migrate } from "drizzle-orm/postgres-js/migrator";
import { drizzle } from "drizzle-orm/postgres-js";
import dotenv from "dotenv";
dotenv.config();
(async () => {
const connectionString = process.env.POSTGRES_URL!;
const migrationsClient = postgres(connectionString, { max: 1 });
const db = drizzle(migrationsClient);
await migrate(db, { migrationsFolder: "./src/migrations" });
await migrationsClient.end();
})();Now we can apply our migration by running the script like so:
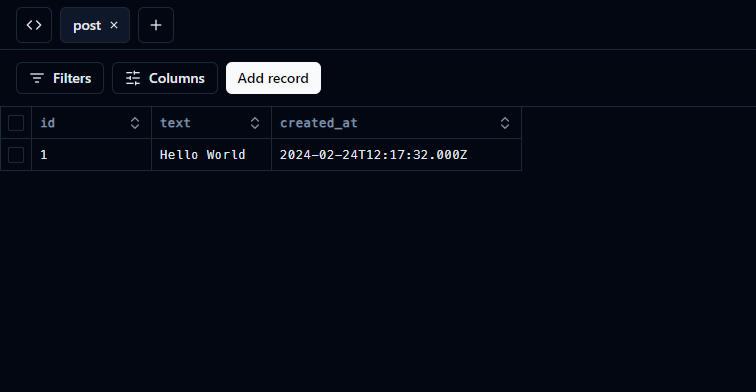
npx tsx src/scripts/migration.tsxFinally we can populate our database using Drizzle Studio:
npx drizzle-kit studio
Connecting to the Database
Now that we have a database up-and-running with data, let’s display it in our Next.js app! To do that we must first create a database client:
touch src/db.tsimport { drizzle, type PostgresJsDatabase } from "drizzle-orm/postgres-js";
import postgres from "postgres";
// Fix for "sorry, too many clients already"
declare global {
// eslint-disable-next-line no-var -- only var works here
var db: PostgresJsDatabase | undefined;
}
let db: PostgresJsDatabase;
if (process.env.NODE_ENV === "production") {
db = drizzle(postgres(process.env.POSTGRES_URL!));
} else {
if (!global.db) global.db = drizzle(postgres(process.env.POSTGRES_URL!));
db = global.db;
}
export { db };Using this client, let’s display the text from our first post entry by replacing the contents of src/app/page.tsx with the following:
import { db } from "@/db";
import { post } from "@/schemas/post";
import styles from "./page.module.css";

export default async function Home() {
  const posts = await db.select().from(post);

  return <main className={styles.main}>{posts[0].text}</main>;
}
If we run our Next.js app locally we should see a black screen with the text “Hello World”. But if we run this using Docker Compose we will get an error because our Next.js container is unable to connect to our Postgres container. This is because our connection string uses localhost but for docker containers to connect to one another they must use the appropriate Docker Compose service name.
Let’s fix this by adding the following line to our .env file:
DOCKER_POSTGRES_URL="postgres://root:123@postgres-db:5432/example"And let’s tell Docker Compose to replace POSTGRES_URL with DOCKER_POSTGRES_URL by adding the following to our docker-compose.yaml’s next-app section:
environment:
  POSTGRES_URL: ${DOCKER_POSTGRES_URL}
If we run docker compose up now, we should see our text displaying correctly.
But if we save any additional changes while the app is running, our app does not update…
Enabling Docker Compose Watch
To leverage the hot-module reloading capabilities of docker compose watch we must define watch actions in our docker-compose.yaml to tell Docker Compose to sync our code when we save it.
To do this, replace our previously defined volumes with appropriate sync actions so that the final docker-compose.yaml file looks like this:
version: "3"
services:
  next-app:
    container_name: next-app
    restart: always
    build:
      dockerfile: Dockerfile
    environment:
      POSTGRES_URL: ${DOCKER_POSTGRES_URL}
    develop:
      watch:
        - action: sync
          path: ./src
          target: /app/src
          ignore:
            - node_modules/
        - action: sync
          path: ./public
          target: /app/public
    ports:
      - 3000:3000
  postgres-db:
    image: postgres:16.0
    container_name: postgres-db
    restart: always
    environment:
      POSTGRES_DB: example
      POSTGRES_USER: root
      POSTGRES_PASSWORD: 123
    ports:
      - 5432:5432
Now we can finally run docker compose watch to have our 2 containers run and respond to changes!
And as our application grows in complexity we can add additional services to our Docker Compose configuration and enjoy the amazing DX benefits of docker compose watch.
The source code for this project is available on github.
Caveats
docker compose watch does not print container output to the console like docker compose up.
To remedy this, we must attach to the containers in a separate terminal session or inspect the output via Docker Desktop.
This new feature also lacks many common option paramters, so running docker compose watch in detached mode, for example, does not work.